Subsections of Admin Documentation
Global Settings
Manage the global application settings by navigating to Administration → Global Settings
Subsections of Global Settings
General
Base URL
This is the base URL for the frontend application. All links created (for emails etc.) will be prefixed by this URL.
Organization name
The name that will be shown in the top menu
Enable manager approval functionality
Enable this setting if you want to enable functionality to require user manager approval for selected services or bundles before its provisioning (this is controlled on individual services / bundles).
Require manager of manager approval
By default the manager approval is required only for team members, not for line managers. Enable this setting if the manager approval is also required for line managers.
Hourly labor cost
The average labor cost per hour to calculate amount of saved money by executing services.
JWT expiration time
The number of hours it takes for Bearer tokens (issued for every user on authentication to Serviceboard) to expire. Default is 24 hours.
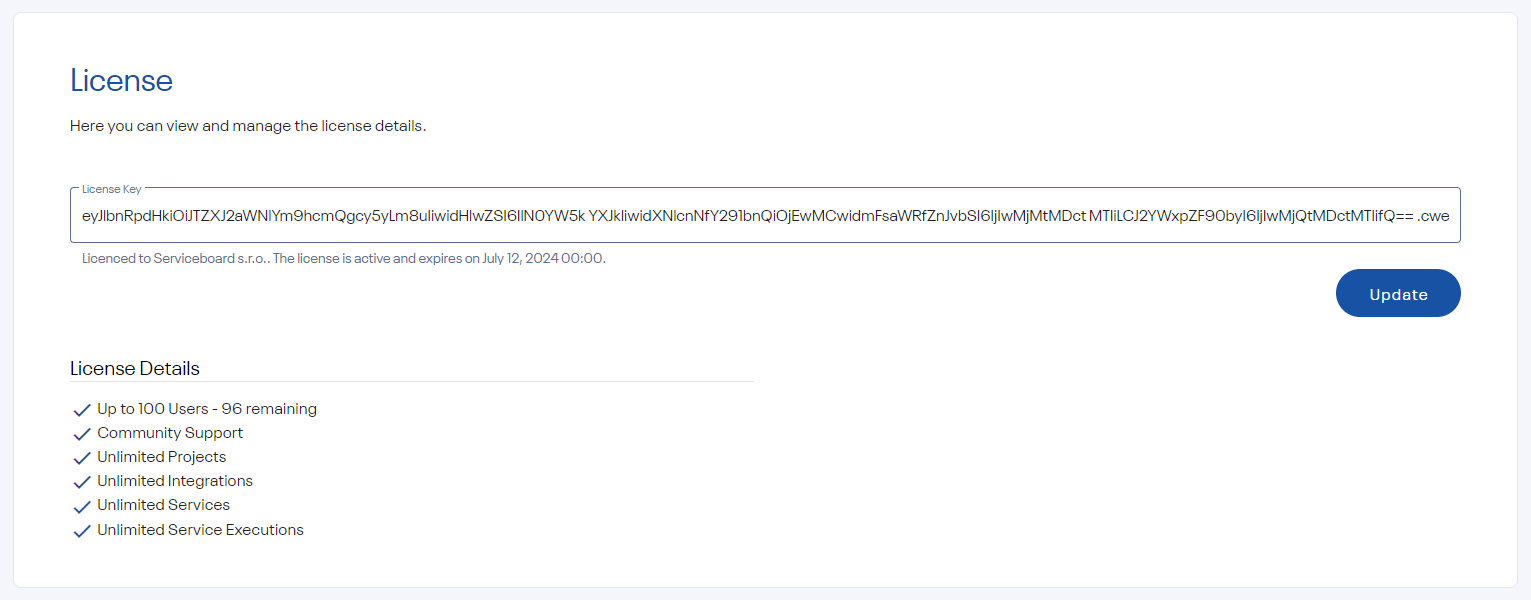
License
Info
For any questions related to licensing, contact us at [email protected].
Outgoing Mail
This section helps you to configure your SMTP server. This server will be used to send all outgoing emails.
Note
You need to restart the backend application to fully apply the changes.
| Setting | Description | Example |
|---|---|---|
| From address | The default address this server will use to send emails from. | [email protected] |
| Email prefix | This prefix will be prepended to all outgoing email subjects. | Serviceboard |
| Host name | The SMTP host name of your mail server. | smtp.example.com |
| Port | The SMTP port of your mail server. | 25 |
Secrets Store
Serviceboard provides two options for managing and storing your secrets which are used to authenticate to your integration services:
Internal Store
The secrets are securely stored and encrypted in your database and decrypted only when used (e.g. provisioning a service).
Azure Key Vault
Only non sensitive data is stored in your database for better user experience when working with Serviceboard, however the secrets itself (such as passwords, tokens, api keys etc) are stored in Azure Key Vault and are fetched only during service execution.
Subsections of Secrets Store
Azure Key Vault
This section helps you to configure your secrets store when using Azure Key Vault service.
Note
You need to restart the backend application to fully apply the changes.
Azure Configuration
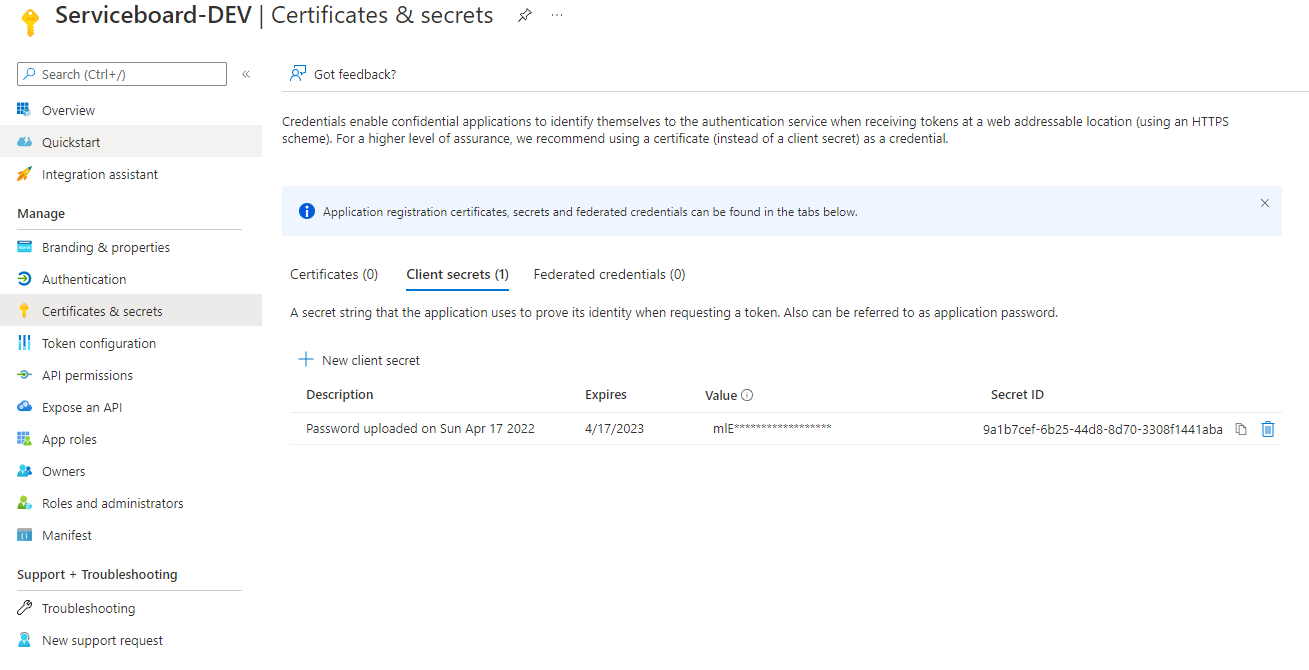
Create an Azure Enterprise Application
- Navigate to App Registrations and create a new application (e.g. Serviceboard).
- Open the application overview and create a new client secret in the Certificates & secrets section.
Note
Save the client secret value as you will need it for enabling the integration with Serviceboard.
Create an Azure Key Vault
- Navigate to Key Vaults and create a new one:
- Name (e.g. Serviceboard)
- Add an Access Policy for the application you created in the previous step with the following scopes: Get, Set
and Delete for the Secret permissions.
 !
! - Select principal: select the application you created before.
- Click Add
Serviceboard Configuration
Navigate to Settings → Global Settings → Secrets Store and change the secret store to Azure Key Vault. The following configurations need to be done as well:
| Setting | Description | Example |
|---|---|---|
| Tenant ID | Tenant ID - Can be found in Overview section of your Azure Active Directory. | f1a9ce31-280c-4525-91ff-48dc4ab567a5 |
| Client ID | Application ID of the enterprise application created in Azure. Can be found in Properties section of your created Enterprise Application. | d7c78506-331f-404c-88e1-08d40bb0e4ab |
| Subscription ID | Subscription ID Can be found in Properties section of your created Key Vault. | a49a22c4-43bb-4339-83c7-12c4d7073c6a |
| Vault Base URL | The base url of your Azure key vault. Can be found in Properties section of your created Key Vault. | https://serviceboard.vault.azure.net/ |
| Api Version | Api Version | 7.3 |
| Scope | Scope for your Key Vault. | https://vault.azure.net/.default |
Security
Subsections of Security
LDAP Integration
This section helps you to configure your LDAP server. LDAP is the Lightweight Directory Access Protocol. It’s a hierarchical organization of Users, Groups, and Organizational Units - which are containers for users and groups. Every object has it’s own unique path to it’s place in the directory - called a Distinguished Name, or DN.
Manage the LDAP settings by navigating to Administration → Security → LDAP Configuration.
Note
You need to restart the backend application to fully apply the changes.
LDAP configuration
The following settings are available:
Server Details
| Setting | Description | Example |
|---|---|---|
| Server URL | FQDN/IP of the LDAP server | ldap.example.com |
| Port URL | The port of your LDAP server. | 389 |
| Method | The authentication method. | simple / simple_tls / start_tls |
| Admin DN | Used only with search authentication method. It is the DN of the user who will bind to the LDAP server to perform the search. | uid=serviceboard,cn=users,cn=accounts,dc=int,dc=serviceboard,dc=io |
| Password | Password used to authenticate to your LDAP server. |
User Search & Filters
Note
Only direct group members are synchronized (indirect membership is currently not supported).
Info
User accounts are created in Serviceboard on the first authentication to Serviceboard. If a user object is not returned by LDAP configuration, it is disabled automatically.
Info
First name, last name and line manager is updated automatically on every user authentication if there is any change to those attributes.
| Setting | Description | Example |
|---|---|---|
| User Search Base | User search base for filtering users. | cn=accounts,dc=int,dc=serviceboard,dc=io |
| Group membership | Enable if the authenticated user must be a member of a specific group(s). | Group Search Base: cn=groups,cn=accounts,dc=int,dc=dostack,dc=io Group Membership Attribute: member Group DN: cn=serviceboard-users,cn=groups,cn=accounts,dc=int,dc=dostack,dc=io |
| Attributes | Enable if the authenticated user should meet a certain criteria, | Attribute: objectClass Value: inetOrgPerson |
| Attribute presence | Enable if the authenticated user should contain a specific attributes. | Attribute: mail |
User Attribute Mappings
| Setting | Description | Example |
|---|---|---|
| Username | User attribute of the username. | uid |
| First Name | User attribute of the first name. | givenName |
| Last Name | User attribute of the last name. | sn |
| User attribute of the email. | ||
| Manager | User attribute of the line manager. | manager |
Groups Synchronization
Info
Groups are fetched from LDAP automatically. If a group is not returned by LDAP configuration, it is disabled automatically. Members (users) of are automatically added unless they have not authenticate to Serviceboard yet.
| Setting | Description | Example |
|---|---|---|
| Group Search Base | Group search base for filtering groups. | cn=groups,cn=accounts,dc=int,dc=serviceboard,dc=io |
| Group Filter | Filter for filtering groups. | |
| Name | Group attribute of the name. | name |
| Description | Group attribute of the description. | description |
| Members | UGroup attribute of the members. | member |
Test Connection
Tests ability to connect to your LDAP server. Also tests ability to authenticate test-user and shows result of mapping-test-user’s meta-data. You need to save the LDAP configurations above in order to test it. Note: test-user credentials are not saved in DB.
Users
User management section helps you to view and manage users by navigating to Administration → Security → Users.
Serviceboard provides roles model to empower users to perform certain actions. The following roles are available:
Info
Exactly one role can be assigned to a single user.
- Admin - Can manage permissions across the entire organization and other administrative functions available.
- Project Creator - Can create and manage owned enterprise projects.
- User - Can log in to the application, browse non restricted enterprise projects, manage projects with privileged access and consume available services.
Role can be changed from the user detail page.
Groups
Group management section helps you to view and manage groups for your organization by navigating to Administration → Security → Groups.
If you enabled the groups sync from LDAP, they will be automatically fetched and made available in Serviceboard. However, you also can create internal groups directly in Serviceboard.
Info
Groups are typically used for more efficient restriction of individual services or bundles or to manage enterprise projects.
Secrets
Secrets are used to authenticate to REST APIs of your integrations or external field inputs. Navigate to Administration → Security → Secrets to manage secrets.
Serviceboard currently supports the following secret types:
- Username/Password
- Token
- Bearer Token
Info
For increased security and better management, you may use an external secrets store, read more Secret Store
Projects
Projects represent enterprise projects / teams / organization units that need to manage and provision services via a self-service.
Projects can be created by users with any of the roles Admin or Project Creator.
Subsections of Projects
Categories
Project Categories help you organize projects into meaningful buckets and used later for filtering or configuring default form values.
Navigate to Administration → Projects → Categories to view or create a new project category.
Fields
Fields is a feature which allows administrators to add additional information when creating a new enterprise project. You can manage the fields from Administration → Projects → Fields.
Fields can be set as optional/required, hidden/visible and can depend on each other.
Info
Unlimited fields hierarchy is supported.
Field Types
The following field types are available:
- String
- Text
- Number
- Single Select
- Multi Select
- Checkbox
- Radiobutton
- Date
- External (fetch data in real-time via REST API)
- Group Picker
- User Picker (fetch users from LDAP)
Default Values
Default values help you to prefill selected field values when a user is creating new enterprise project. This is especially useful for hidden fields. Default values can be defined globally or per Project Category.
Note
Default value cannot be created for Date or External fields.
Terms of Use
Terms of Use helps you define responsibilities of users owning an enterprise projects.
Navigate to Administration → Projects → Terms of Use to manage terms of use for enterprise projects.
Info
Usually more regulated companies (such as finance and pharma) requires their employees to agree to specific terms of use before they get an access to a system for use.
Templates
Subsections of Templates
Integration Templates
Navigate to Administration → Templates → Integrations to manage integration templates.
Integration templates helps you to define and manage integration definitions. An integration in Serviceboard is represented by a system (e.g. Jira Cloud, Sharepoint, MS Teams or any other system that provides REST API).
As the name describes, we are defining a system in general (e.g. Jira Cloud), not a specific instance of Jira Cloud yet.
This way, you can have just one integration definition and reuse it for as many systems or environments of the same type as you need, without reinventing the wheel again.
Info
Same as enterprise projects, you can define terms of use for integration templates. In larger organizations the systems are owned and managed by different internal groups and each group has their own terms of use they require to agree with by their users before they allow them to access and use it.
Info
Icons of integration templates are displayed in the catalog of associated services for end users.
Service Templates
Navigate to Administration → Templates→ Services to manage service templates.
Service templates helps you to define and manage service definitions.
Service Types
Workspace
A service that results in creation of a workspace (e.g. Jira Project, Sharepoint Space..) and you can navigate to it by visiting a specific URL.
Automation
A service that just performs an action - automation (e.g. generate a report..).
Info
1 service template = 1 REST API endpoint
Info
Standalone service = service that can be provisioned individually, not necessarily in a bundle only.
Request
You can use the following format to use dynamic inputs (taken from what a user enters into the form):
param=#{fk_fieldkey} Note
A field must be created in advance to use the dynamic input for it.
Response
Process the data received on the response and store its values (e.g. in form of workspaces).
This is applicable only to the Workspace service type, and after each successful execution of the service, a new workspace is created in the section Home → My Workspaces or Projects → PROJECT NAME → Workspaces.
Additionally to dynamic inputs mentioned in the Request section above, you can use also JSON path or a fixed variable:
#{fk_integration_base_url} -> returns the URL of an integration instance
${$.xxx} -> parse the JSON response to get a value
Fields
Fields is a feature which allows administrators to add additional information when creating a new enterprise project. You can manage the fields from Administration → Templates → Services → SERVICE NAME → Manage Fields.
Fields can be set as optional/required, hidden/visible and can depend on each other.
Info
Unlimited fields hierarchy is supported.
Field Types
The following field types are available:
- String
- Text
- Number
- Single Select
- Multi Select
- Checkbox
- Radiobutton
- Date
- External (fetch data in real-time via REST API)
- Group Picker
- User Picker (fetch users from LDAP)
- Secret (hidden by default)
Default Values
Default values help you to prefill selected field values when a user opens a service form. This is especially useful for hidden fields. Default values can be defined globally or per Project Category.
Note
Default value cannot be created for Date or External fields.
Service Categories
Service Categories help you organize services into meaningful buckets and used later for filtering or configuring default form values.
Navigate to Administration → Templates → Services → Service Categories to view or create a new service category.
Catalog
Subsections of Catalog
Integrations
Navigate to Administration → Catalog→ Integrations to manage integrations.
In compare to Integration templates, the integrations are the real instances of the given integration templates (e.g. your production instance of Jira Cloud running for example at https://SOMENAME.atlassian.net).
You can make integrations and all related services restricted and accessible only to authorized users or group of users.
Info
This is also very useful, if you want to expose some parts of the target system administration functionality to privileged users (which is many times not possible in that system directly due to limited granularity of permissions).
Each integration has it’s business or technical owner, who the end users may contact in case of questions or asking for a access to restricted services.
Services
Navigate to Administration → Catalog → Services to manage services.
In compare to Service templates, the services are instances of real integrations and associated services (e.g. Jira Project, MS Teams channel, Trello workspace, Sharepoint space..).
You can make also individual services restricted and accessible only to authorized users or group of users.

Note
If you enabled the manager approval functionality on a global level, you can now require this manager approval for the given service from users who try to provision the service.
Bundles
Navigate to Administration → Catalog → Bundles to manage bundles.
Bundles help you to organize multiple IT Services into a bucket for easier provisioning.
Info
There is no limit for maximum number of IT Services added to a bundle.
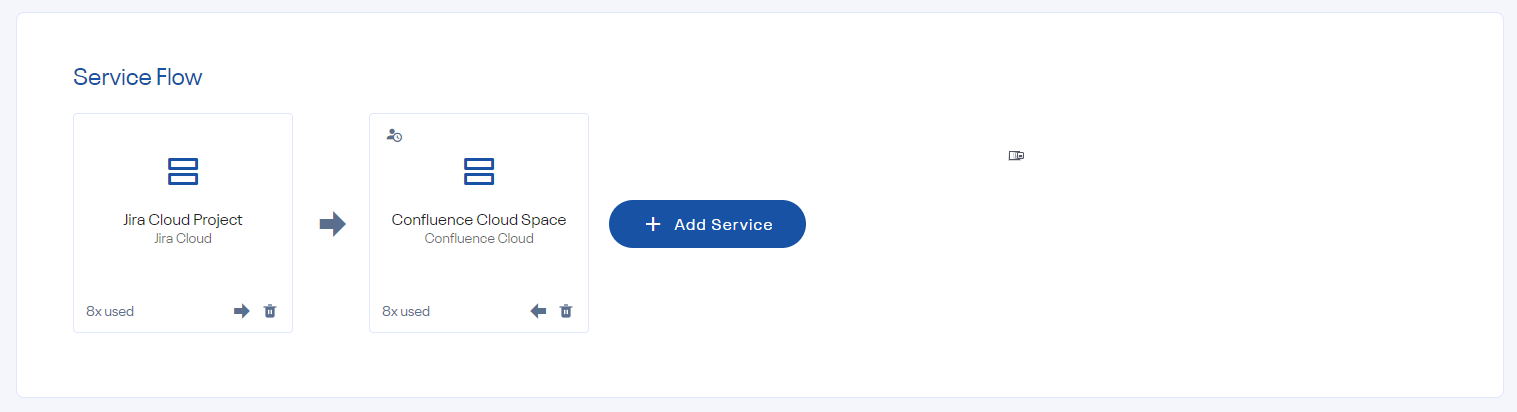
Service Dependencies
An IT Service can be dependent on execution of other IT Service in the bundle, wait for it’s response output and set input dynamically.
It helps you to minimize number of inputs and possible duplicated values to be filled by end user when requesting more IT Services in the bundle with same inputs.

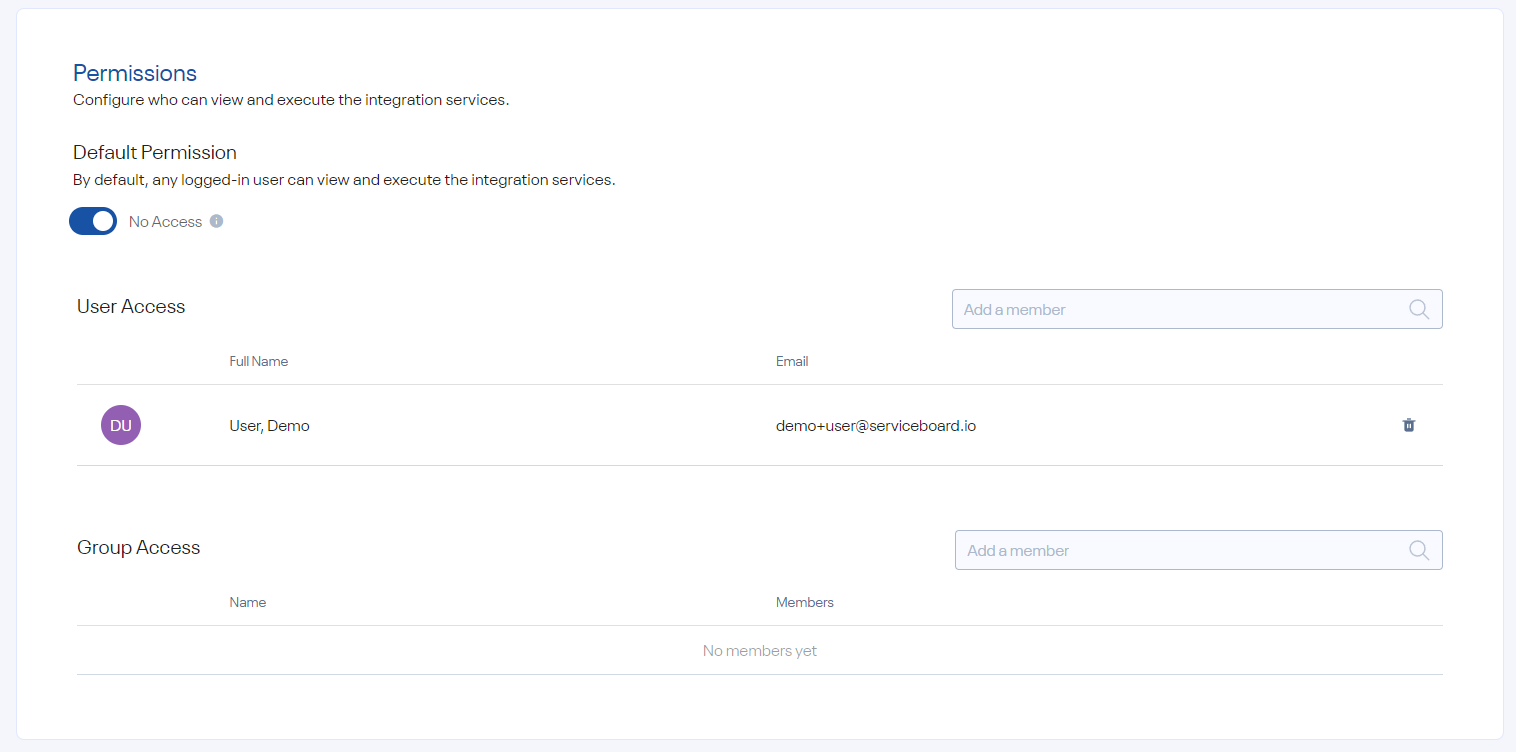
Permissions
Same as integrations and services, you can make the bundles accessible only to authorized users or group of users.

Scheduler
Subsections of Scheduler
Workers
Navigate to Administration → Scheduler → Workers to view active workers and work schedule for your organization.
A worker is virtual worker executing scheduled jobs. The list below represents available workers in Serviceboard:
| Name | Description |
|---|---|
| AzureKeyVaultWorker | Sync Azure key vault secrets |
| ServiceExecutionWorker | Executing services |
| ReindexWorker | Reindex the search data |
| LdapGroupsWorker | Sync LDAP groups |
| LdapUsersWorker | Sync LDAP users |
Cron Jobs
Navigate to Administration → Scheduler → Cron Jobs to view cron jobs.
Cron Jobs execute jobs based on a defined schedule.. The list below represents available cron jobs in Serviceboard:
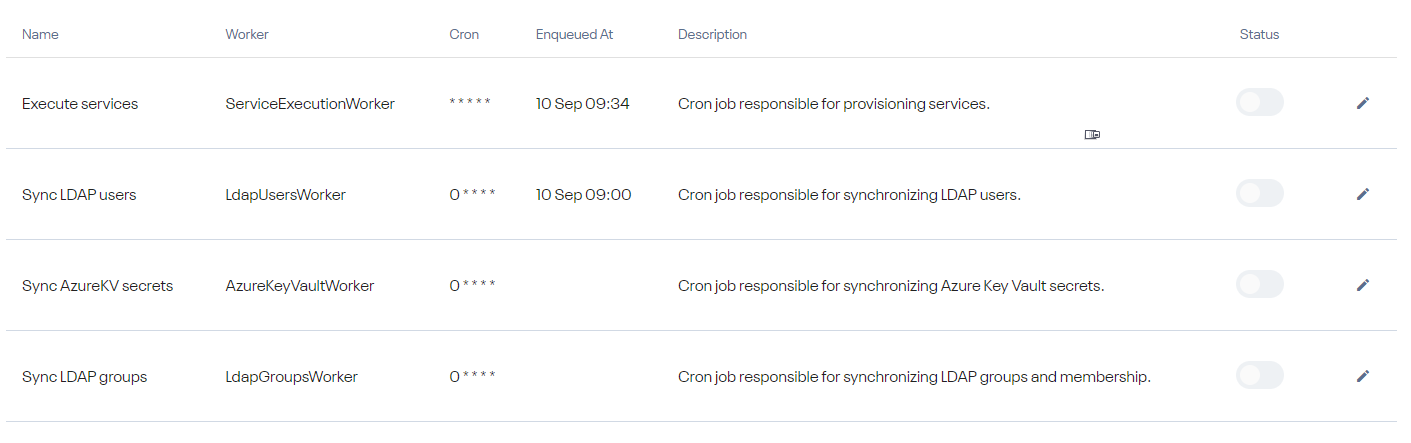
Note
You can change the schedule to address your specific needs.
Jobs
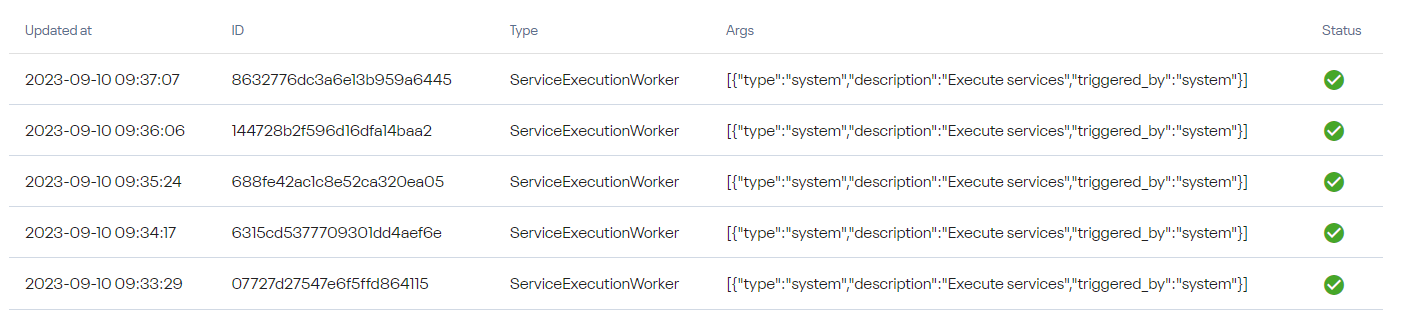
Navigate to Administration → Scheduler → Jobs to view jobs.
Jobs are automated tasks scheduled for execution (run in background asynchronously). You can see only jobs scheduled in the last 30 minutes.
Example:
Other
Other section helps you to troubleshoot issues and view user satisfaction.
Subsections of Other
Activities
Navigate to Administration → Other → Activities to view or troubleshoot issues related to executing IT services.
Each IT Service execution shows the following information:
-
Details - basic details about the IT Service execution
- Project
- Executed by
- Started at
- Completed at
-
Inputs - inputs provided by end users
-
Request - all details used for executing the REST API call
- Method
- URL
- Secret
- Body
- Headers
-
Response - HTTP response returned from REST API call

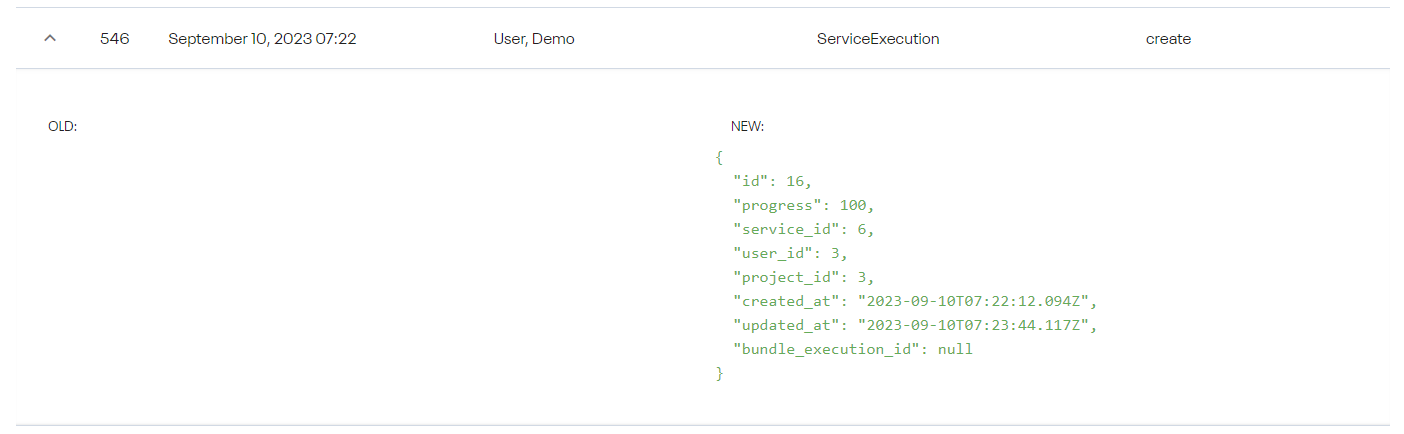
Audit Log
Navigate to Administration → Other → Audit Log to view audit logs of captured events by recording who performed an activity (empty if it was a system change), what activity, and how the system responded.
Example:
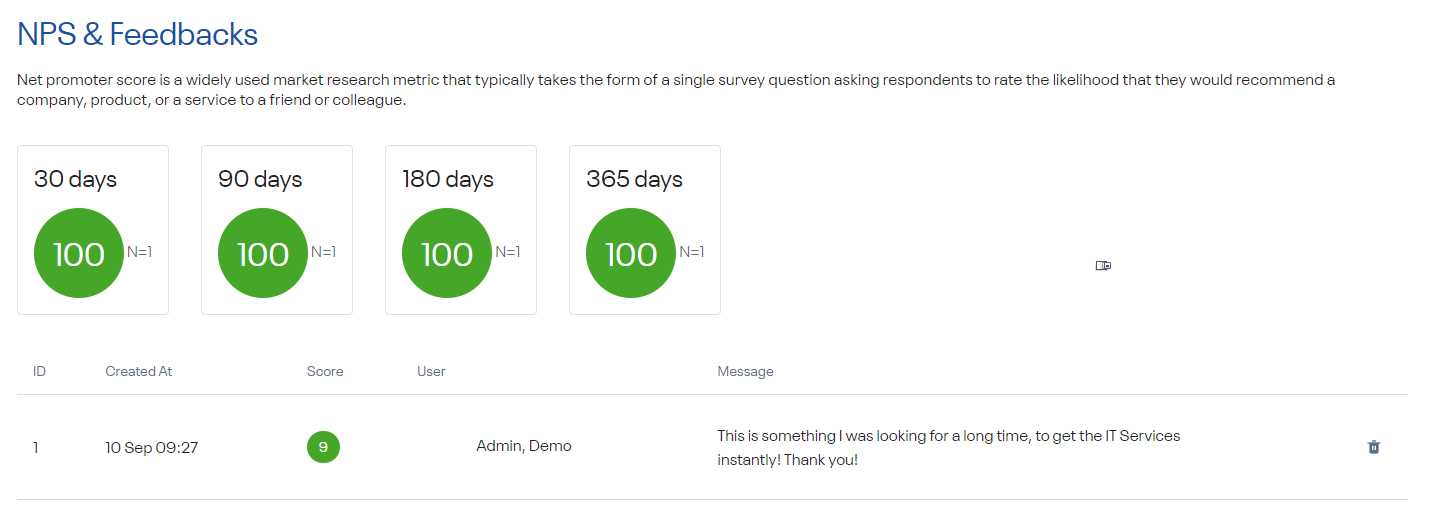
NPS & Feedbacks
Navigate to Administration → Other → NPS & Feedback to see and manage user feedback.
Net promoter score is a widely used market research metric that typically takes the form of a single survey question asking respondents to rate the likelihood that they would recommend a company, product, or a service to a friend or colleague.
Quick Links
Quick Links help you to manage sidebar navigation links (typically led to other systems) as a quick navigation for your end users.
Navigate to Administration → Add Link to create a new quick link.
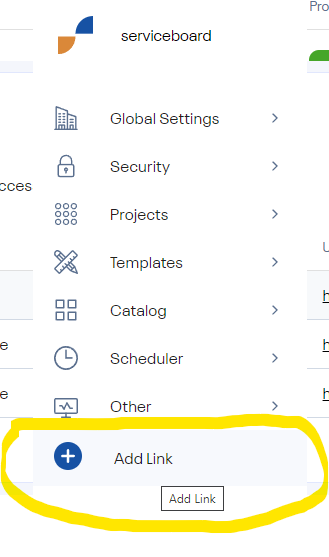
Info
You can create up to 5 quick links.